学习目标
- 程序化质感和表面 Marble pattern。
- 理解两种 Marble pattern Blending。
根据目录结构,这本书的前面的部分会注重说明节点。
就算在 SD 里制作 Jade(玉) 的程序化贴图,但是视觉上 Jade 的透射效果要从 Shader 上表现(不是所有玉都有透射现象,这是固定观念。) 才会更真实。
这本书的后半段会用 Marmoset viewer 或者 RendeMan render 再把本次案例做得更写实一点。

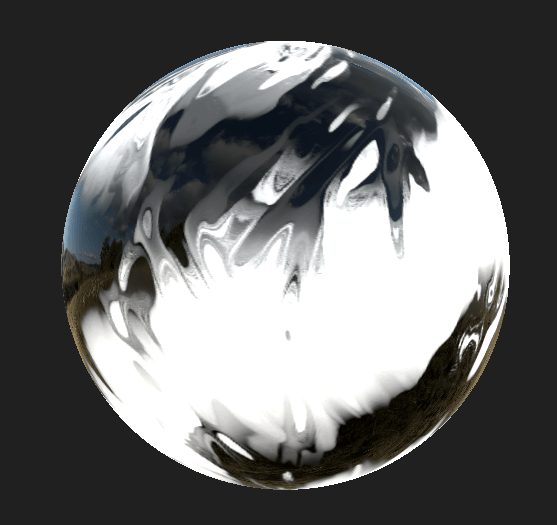
我们要做的结果案例。
制作上图的案例,重点了解怎么控制两个大样式并怎么混合得到想要的结果。
需要的 Node 列表。

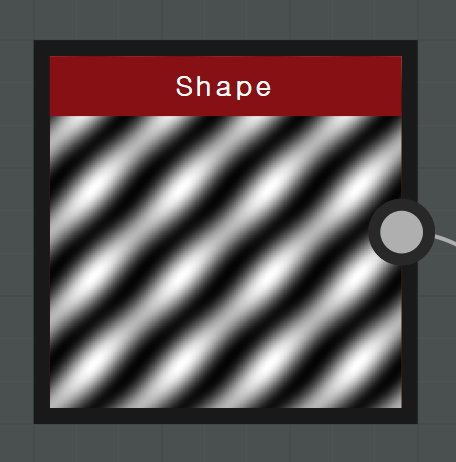
Shape
支持各种形态用成 Input , Shape 是 Procedural texturing 的始发点所以是重要的基础。

Tile Random
这是使用导入的 Input 或者 Node 内部提供的 Shape ,变换成不规则的 Tiled Shape 的必要 Node 。
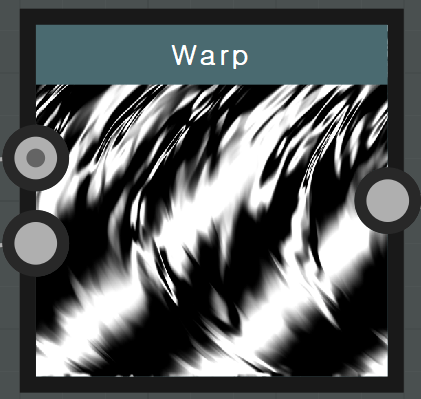
Warp
根据 Warping 的 Guide 的 Gradient Input 信息,把导入的 Input 形态或者图片做 Warping (扭曲)。

Slope Blur Grayscale
把 Slope(斜率)用 Slope guide input 在输入的 Input 部分形态中表现出斜率。
这里的斜率通常是用 Game Engine 里的 Gradation map 形态来表现。
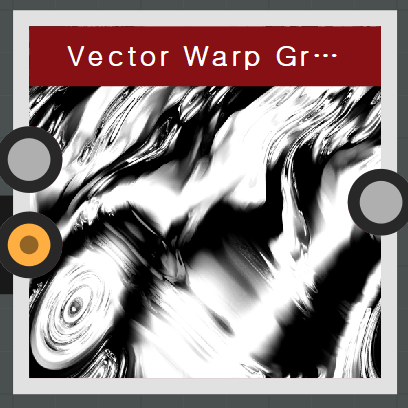
Vector Warp
根据输入的 Vector information texture 扭曲 Pixel 。

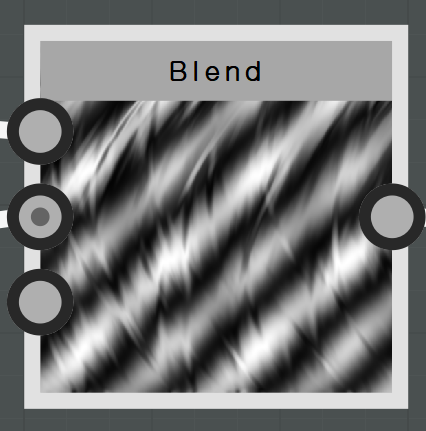
Blend
混合输入的两个 Node 。

Gradient Map
是往做好的 Pattern 把颜色 Replace 的时候很好用的一种 Node ,也是在 Substance designer 里做 Texturing 的时候最常用的一种 Node 。
现在我们看下各个 Node(Filter) 是怎么连接并形成最终结果的。
上面也讲过,有两种样式。
为了完成这项操作,需要使用个别 Shape 和个别 Vector Warp 效果。
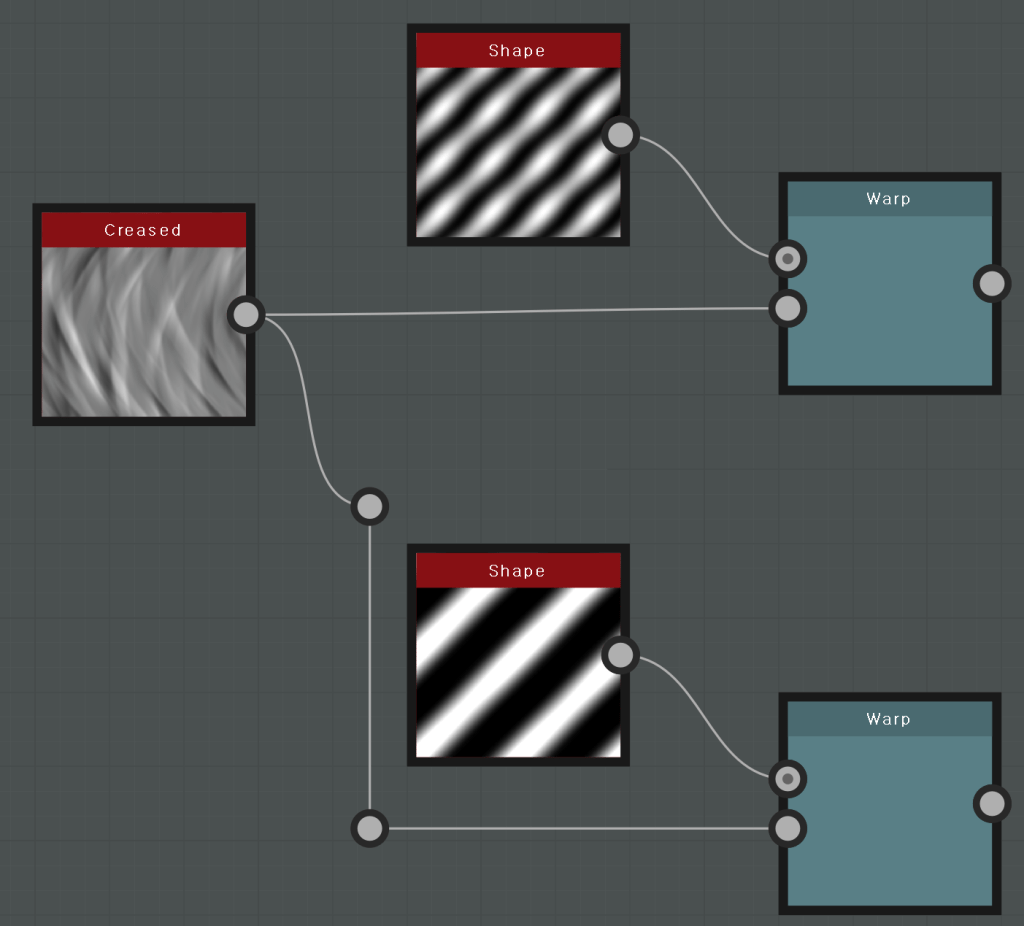
두 개의 Shape node 를 추가 하고 두 개의 Warp node 를 추가 한 후 Shape node 를 각각의 Input 에 연결 합니다.
한 개의 Creased node 를 추가 하고 두 개의 Warp node 의 Gradient Input 에 위 그림과 같이 연결 합니다.
添加两个 Shape node ,添加两个 Warp node 后把 Shape node 连到各自的 Input。
添加一个 Creased node ,两个 Warp node 的 Gradient Input 跟上图一样连接起来。
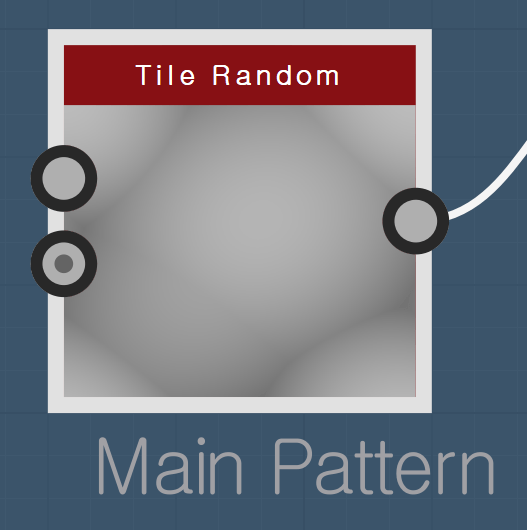
그림을 기준으로 위 쪽 Shape 으로 구성 된 패턴을 Main Pattern 이라고 표기 하며 아래 쪽 Shape으로 구성 된 패턴을 Sub Pattern 이라고 표시 합니다.
以图片为准,上方 Shape 构成的样式叫 Main Pattern ,下方 Shape 构成的样式叫 Sub Pattern 。
上方 Shape 会成为 Main pattern 。

Main pattern 使用的 Shape 参数。
Tiling : 4
Pattern : Bell
Scale : 1.5
Size : X=2 , Y=0.62
Angle : Turns = -0.13 , Degrees = -48
Rotation 45 = False
Non Square Expansion : True
Non Square Tiling : False

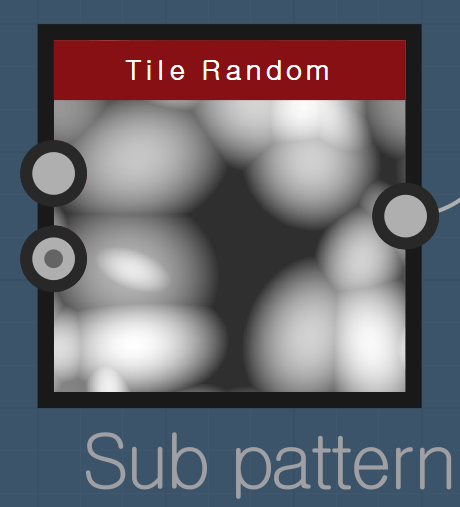
下方 Shape 将成为 Sub pattern 。

用在 Sub pattern 的 Shape 值。
Tiling : 2
Pattern : Brick
Pattern Specific : 0.97
Scale : 1.68
Size : X=2 , Y=0.3
Angle : Turns = -0.12 , Degrees = -43
Rotation 45 = False
Non Square Expansion : True
Non Square Tiling : False
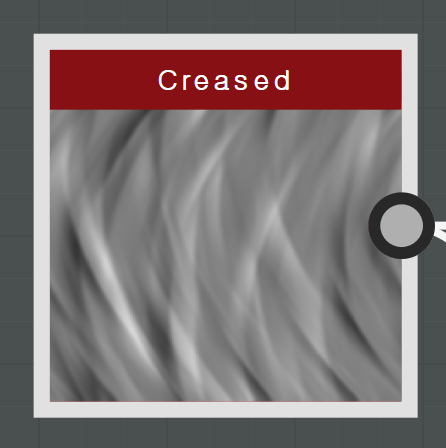
用在 Warp 权重的 Creased node。

Creased node 的参数。
Scale : 1
Disorder : 0.56
Warp Intensity : 0.22
Non Square Expansion : False

Main Pattern Shape node 和 Warp 连接部分
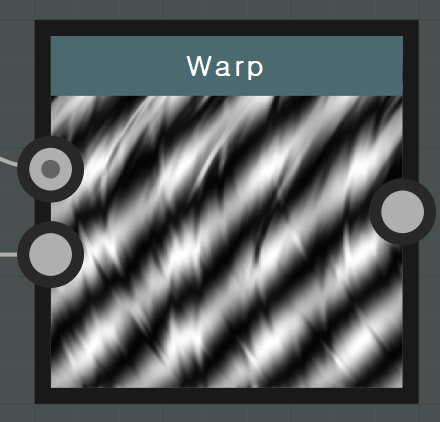
Warp node 的参数。

Intensity : 0.73

Sub Pattern Shape node 和 Warp 连接部分
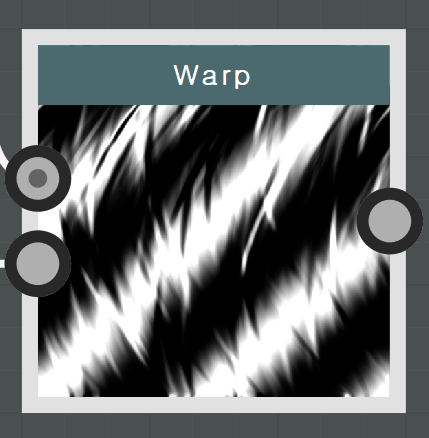
Warp node 的值。

Intensity : 2.43
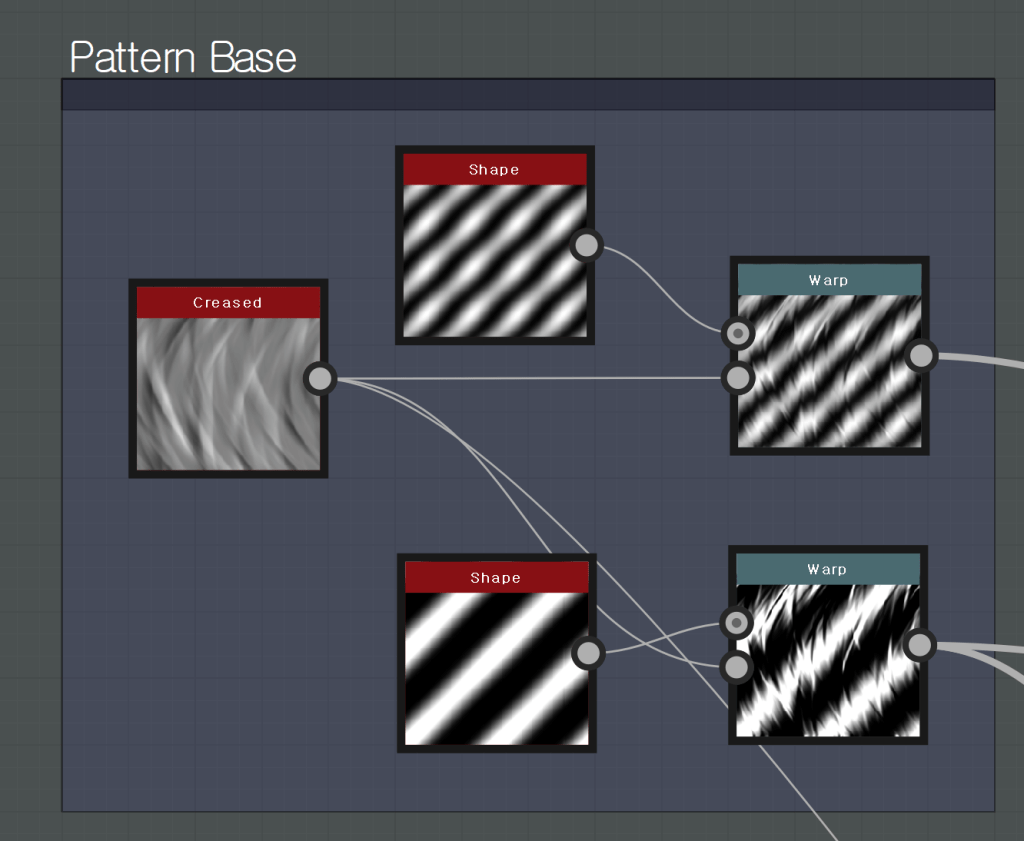
基本样式设好后,做成 Frame 命名为 Pattern Base 。
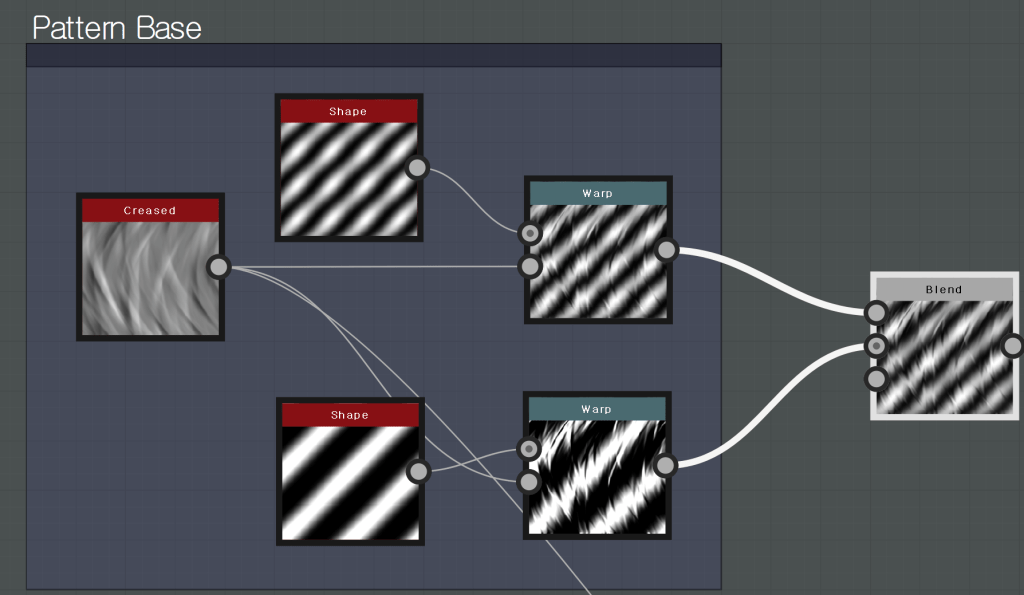
连接一个 Blend node 后,把两个 Warp node 连成上图的样子。
Pattern base 生成的 Main pattern 和 Sub pattern 要进行 Blending 。
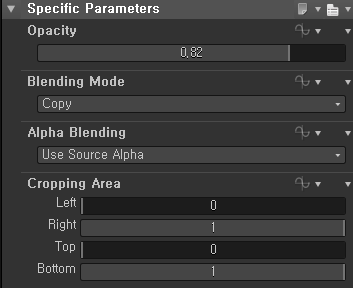
Blend node 的参数。
Opacity : 0.82
Blending Mode : Copy

两种样式 Blending 的结果。
为了让样式的 Edge 部分变得自然,加了 Slope Blur node 。
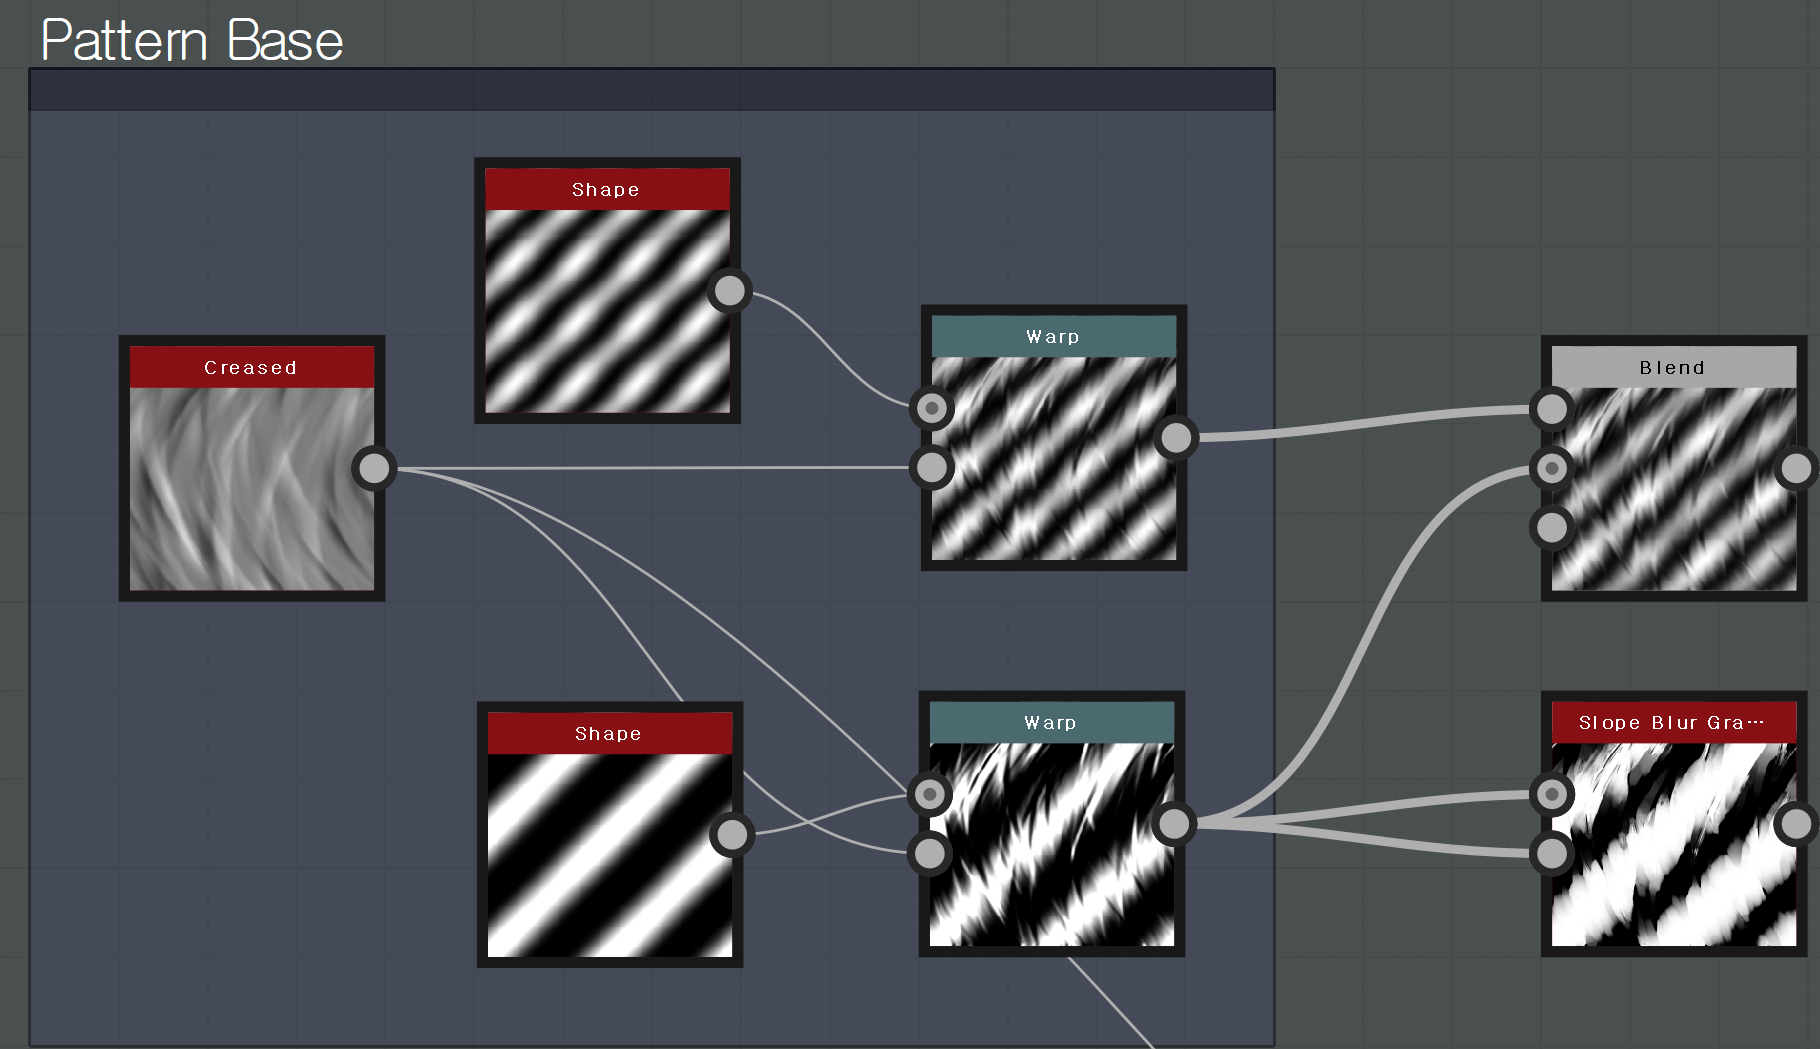
新增下方 Warp node ( Sub pattern )后跟上图一样连接到 Slope Blur Grayscale node 。

Slope Blur Grayscale node 参数。
Samples : 21(数值越低越粗糙)
Intensity : 2.28
Mode : Blur

适用 Slope Blur Grayscale node 的 Sub pattern。

新增 Warp node,把 Sub pattern 的 Slope Blur Grayscale node 连接到 Warp ,把 Creased node 连接到 Warp 的 Gradient Input 。

Warp 参数。
Intensity : 2.45

适用 Warp 的 Sub pattern。

混合 Main Pattern 和 Sub Pattern 。

新增 Blend node 后把已经 Blending 的 Master pattern 的 Blend node 连到 Blend node 的 Foreground Input 上。
适用 Warp 的 Sub pattern 连到新 Blend node 的 Background 。

Blending Mode : Copy
Blend node 参数。
Opacity : 0.75
Blending Mode : Copy

把两种样式 Blending 的结果。
新增两个 Blend node。
在添加好的各个 Blend node 上再添加 Comment ,这样会更方便看。
跟上图一样,把 Pattern Blending A Frame 的两个 Blend node 再次 Blending ,分成 Main pattern 和 Sub pattern 让它更简单。

Main pattern 的 Blend node 参数。
Opacity : 1
Blending Mode : Max (Lighten)
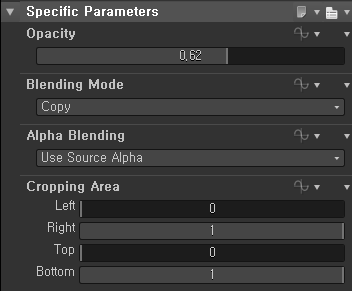
Sub pattern 的 Blend node 参数。
Opacity : 0.62
Blending Mode : Copy

会各自新增两个 Node 。
添加两个 Vector Warp Grayscale 和两个 Tile Random ,跟上图一样连到 Vector Map 上。
Main pattern 的 Vector Map source.

Main Pattern 部分的 Tile Random 参数。
Sub pattern 的 Vector Map source。

Sub Pattern 部分的参数。
为了区分两种样式,还做了些工作。
Main pattern 用的是 HSL node , Sub pattern 跟 Main pattern 再做一次 Blending 后用 Gradient map node 修改了。

先加一个 HSL node 。
把 Additional Warp frame 的 Main pattern 的 Vector Wrap output 连接到新加的 HSL node 上。

HSL node 参数。
Hue : 0.5(Default)
Saturation : 0.5(Default)
Lightness : 0.57
现在为了 Sub pattern 添加 Blend node ,也加一个 Gradient Map node 。
Additional Warp frame 的 Sub pattern 的 Vector Wrap output 连接到新加的 HSL node 后, Blend node output 连到 Gradient Map 。

Blend node 参数。
Opacity : 0.45
Blending Mode : Subtract

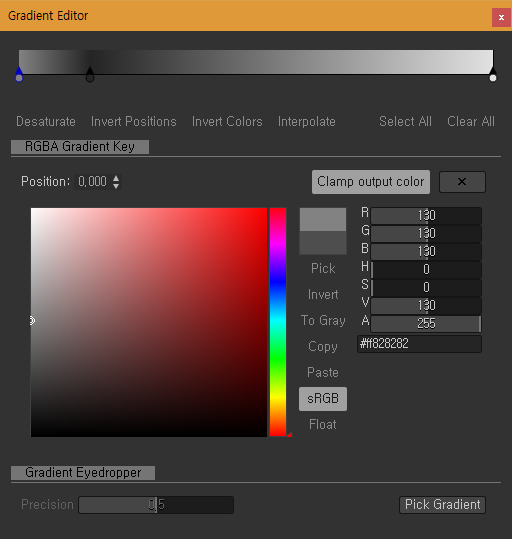
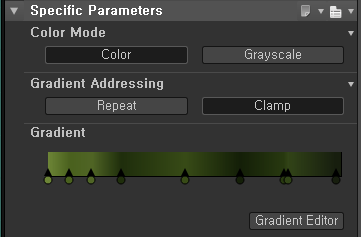
Gradient Map node 参数。
Gradient value : 从左开始 #ff828282 , #ff242424 , #ffe1e1e1
두 패턴의 Blending
两个样式的 Blending
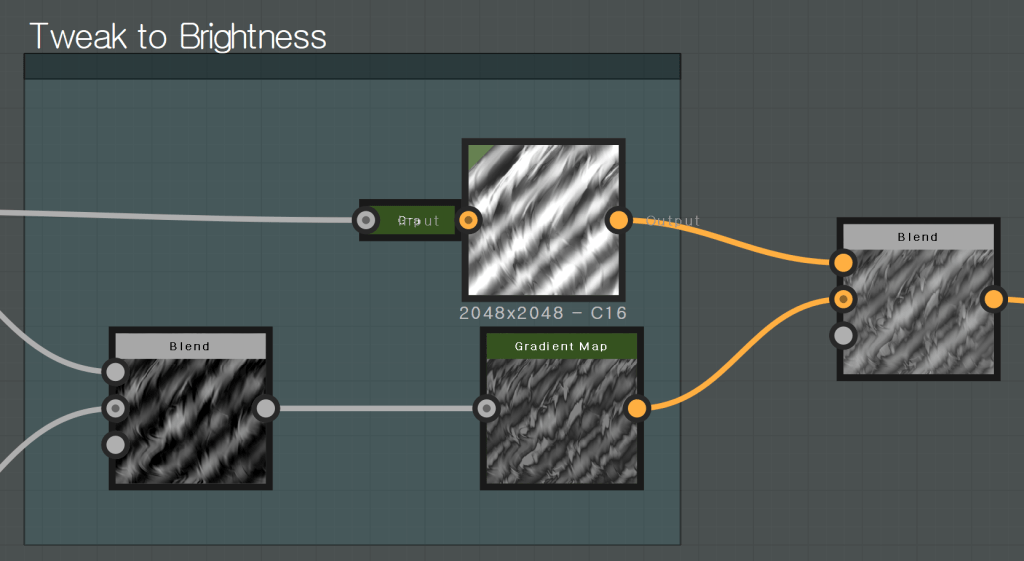
添加新的 Blend node ,跟上图一样在 Foreground 和 Background 各自连接 Tweak to Brightness 的 Output 。

Blend node 参数。
Opacity : 0.32
Blending Mode : Copy
添加很弱的 Normal map surface 。

因为表面不是跟玻璃一样干净,所以稍微加点 Normal map 有时候会更自然。
因为光线的流向会随着表面细微的变化而不同。
添加 Normal node 后连接刚做了 Blending 的 Output。

Normal node 参数。
Intensity : 0.1
Normal Format : OpenGL (这个工程是 OpenGL 。)
使用 Gradient Linear 修改样式的细节。
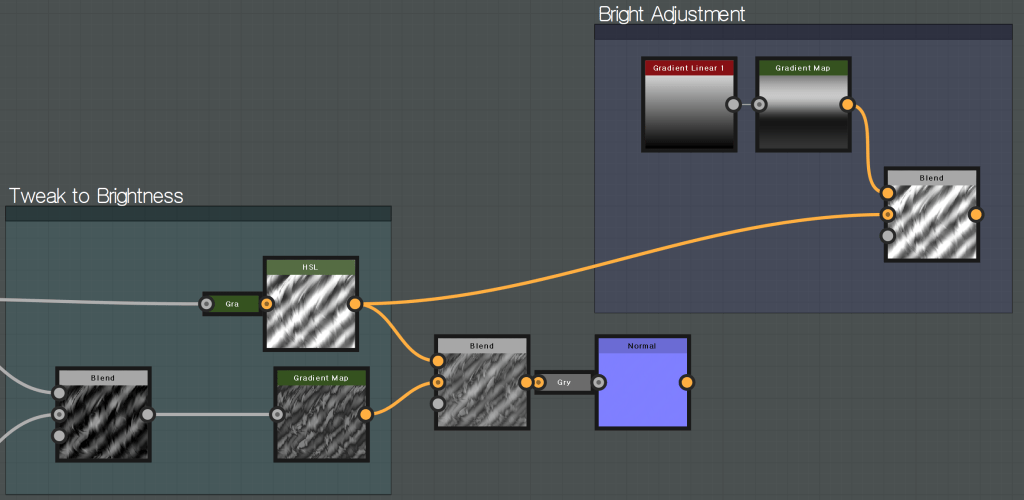
添加 Gradient Linear 1 node 。
添加 Gradient Map 。
添加 Blend node 。
跟上图一样连接,用 Frame 整合起来后命名为 Bright Adjustment 。
在新加的 Blend 的 Background Input 上连接 Tweak to Brightness 的 HSL output 。
Blending Mode : Add(Linear Dodge)
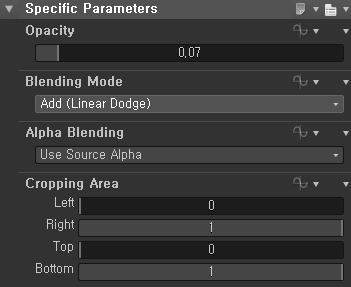
Blend node 参数。
Opacity : 0.07
Blending Mode : Add(Linear Dodge)

Gradient node 설정 값.
Gradient value : 왼쪽으로 부터 #ff343434 , #ff171717 , #ffc8c8c8 , #ff494949
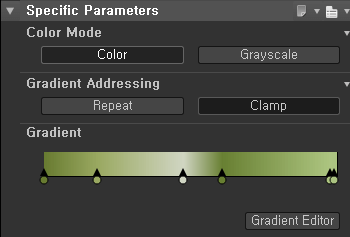
Gradient node 参数。
Gradient value : 从左边开始 #ff343434 , #ff171717 , #ffc8c8c8 , #ff494949
在表面添加 Noise detail 。

新增两个 Blend node 后,用 Frame 整合并命名为 Surface Detail A 。
跟上图一样,把 Bright Adjustment Frame 的 Gradient Output 连到上方 Surface Detail A Frame 的上方 Blend node Foreground 。
Bright Adjustment Frame 的 Blend Output 连到 Surface Detail A Frame 的下方 Blend node Foreground 上。
把连接到 Normal node 的 Blend output 连接到 Surface Detail A Frame 的下方 Blend node Background 上后,把 Surface Detail A Frame 下方 Blend node Output 连到上方 Blend node 的 Background 。

Surface Detail A Frame 上方 Blend node 参数。
Opacity : 0.54
Blending Mode : Multiply

Blending Mode : Add(Linear Dodge)
Surface Detail A Frame 下方 Blend node 参数。
Opacity : 0.55
Blending Mode : Add(Linear Dodge)
给表面上颜色。
因为把样式分成了两个,所以颜色也会分两个上。

制作 Master Color Frame。

Node 放大后的图片。
添加 Creased node , 添加 Clouds 2 node , 添加两个 Gradient Map node ,添加 Level node 后跟上图一样连接。

和 Clouds 2 连接的 Gradient Map node 参数。
Gradient Value : 从左开始设成 #ff6d8537 , #ff4a611e , #ff506526 , #ff1f2e0c , #ff384b17 , #ff141f08 , #ff283910 , #ff324418 , #ff171e0f 。

跟 Creased node 连接的 Gradient Map node。

Creased node 参数。
Warp Intensity : 64
Disorder : 0(Default)
Gradient Map node 参数。
Gradient Value : 从左开始设成 #ff697b31 , #ff9aa962 , #ffd1d6c3 , #ff688032 , #ffadc581 , #ffabc381 。

都连接到 Blend node 上。

Blend node 参数。
Opacity : 0.54
Blending Mode : Max (Lighten)

Master Color 的 Base Color 结果。
制作 Second Color 。
添加两个 Uniform Color node。
添加 Blend node 。
把添加的 Uniform Color node 连接到 Blend node 的 Input 上。
用 Frame 整合,命名为 Second Color。
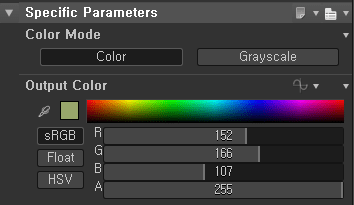
连接到 Foreground 的 Uniform Color node 参数。
RGB : (sRGB) R 152 , G 166 , B 107 A 255
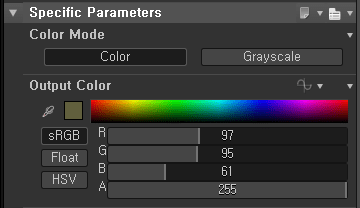
连接到 Background 的 Uniform Color node 参数。
RGB : (sRGB) R 97 , G 95 , B 61 A 255
Surface Detail A Frame 的 Blend Output 连接到 Second Color Frame 的 Blend Mask Input 。

Second Color 的 Base Color 结果。
添加 Dirt noise 并合成颜色。
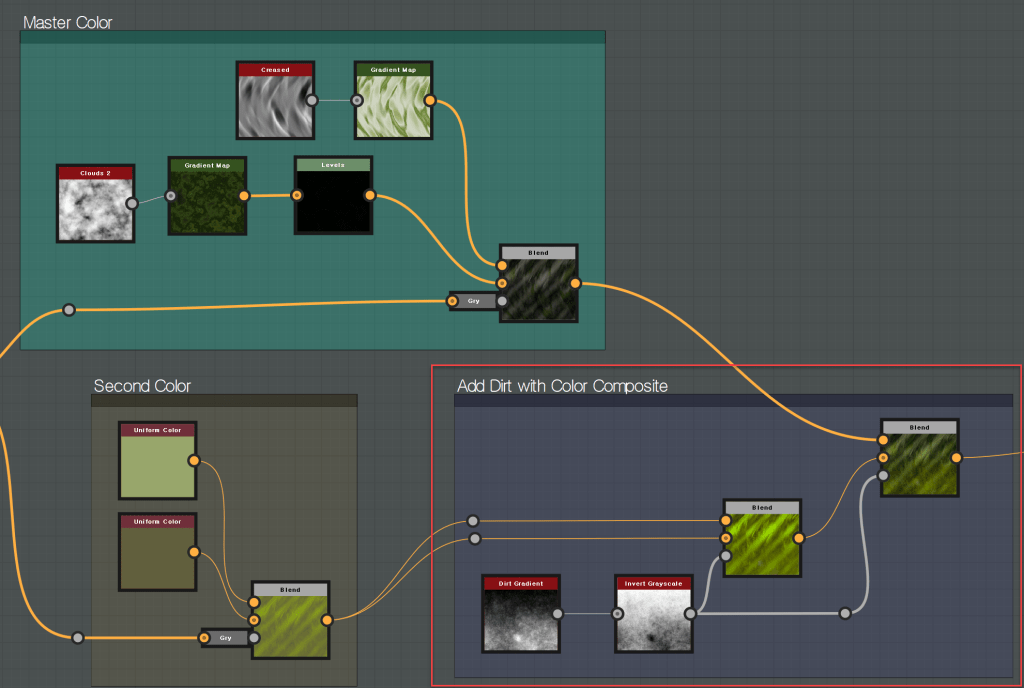
是 Node Flow 。
新增两个 Blend node。
添加 Dirt Gradient node。
添加 Invert Grayscale node。
跟上图 Node Flow 一样连接后修改 Node 参数。
Dirt Gradient 와 Inver Grayscale.
Dirt Gradient 和 Inver Grayscale.


Dirt Gradient node 参数。
基本参数。

Invert Grayscale node 参数。
Invert : True

Blend node 参数。
Opacity : 1
Blending Mode : Add Sub

Master Color Frame 的 Blend output 连到 Add Dirt with Color Composite Frame 最终 Blend node 并修改参数。

Blend node 参数
Opacity : 0.75 ( 越接近 1颜色越浑浊。)
Blending Mode : Copy
调节 Opacity 参数的结果。

Opacity 是 0.9 的时候。

Opacity 是 0.75 的时候。

Opacity 是 0.5 的时候。
颜色的最终合成和修改。

为了最终 Albedo 而做的 Node Flow 。
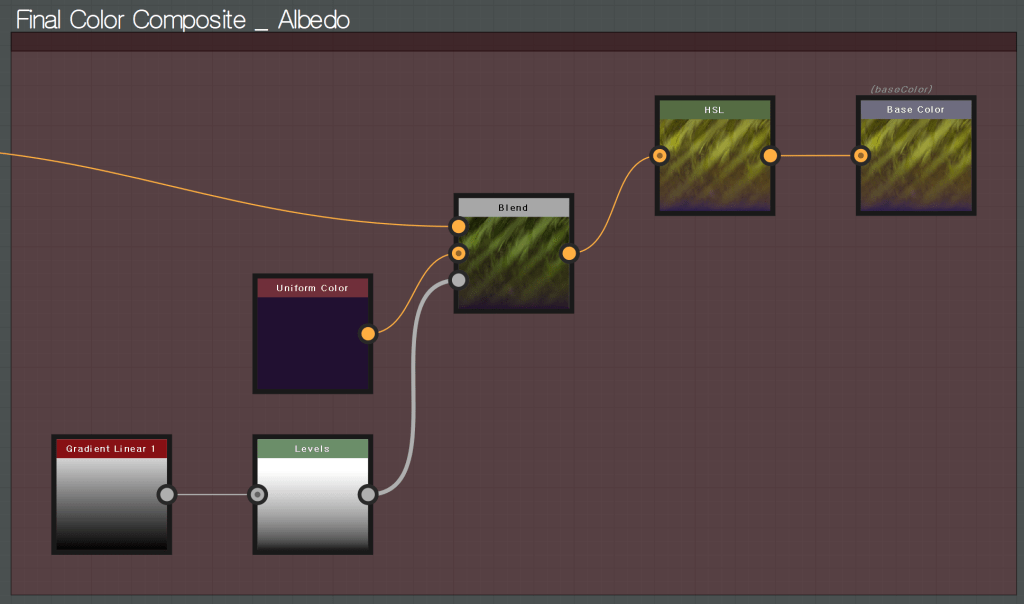
单独看下 Final Color Composite _Albedo Frame 。
添加新的 Node。
添加 Gradient Linear 1 node 和 Level node 并连接起来。
Level node 参数。
Level High : 0.7164949
Level Mid : 0.4436451
添加 Uniform Color node 和 Blend node 并连接。
预先做好的 Level node 连接到 Blend node 的 Mask Input , Uniform Color node 连到 Blend node 的 Background Input 。
Add Dirt with Color Composite Frame 的 Blend Output 连到刚新加的 Blend node 的 Foreground Input 上。
添加 HSL node 后连到 Base Color Output上。
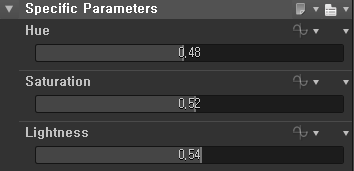
HSL node 参数。
Hue : 0.48
Saturation : 0.52
Lightness : 0.54
最后设置 Metallic 和 Roughness 后结束本堂课吧。
添加两个 Uniform color node,两个都设成 Grayscale 。
添加 Ambient Occlusion node并连接起来。
本次案例不用生成 AO ,但是之后应用的时候会再做一次。

从上面开始是 Metallic , Roughness , Ambient Occlusion 和 Normal 。

Metallic 参数。
L : 9
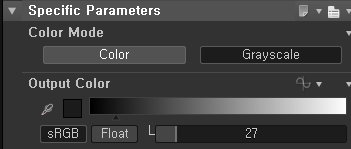
Roughness 参数。
L : 27
Normal Output 连接之前做好的 Surface distortion normal。

现在最基本的 Western Jade 完成了。
以上案例会在高级课程中学习怎么把中间函数显示到外部,怎么在SP让它更丰富。
最后用 Marmoset 和 Pixar RenderMan Render for Maya 渲染。
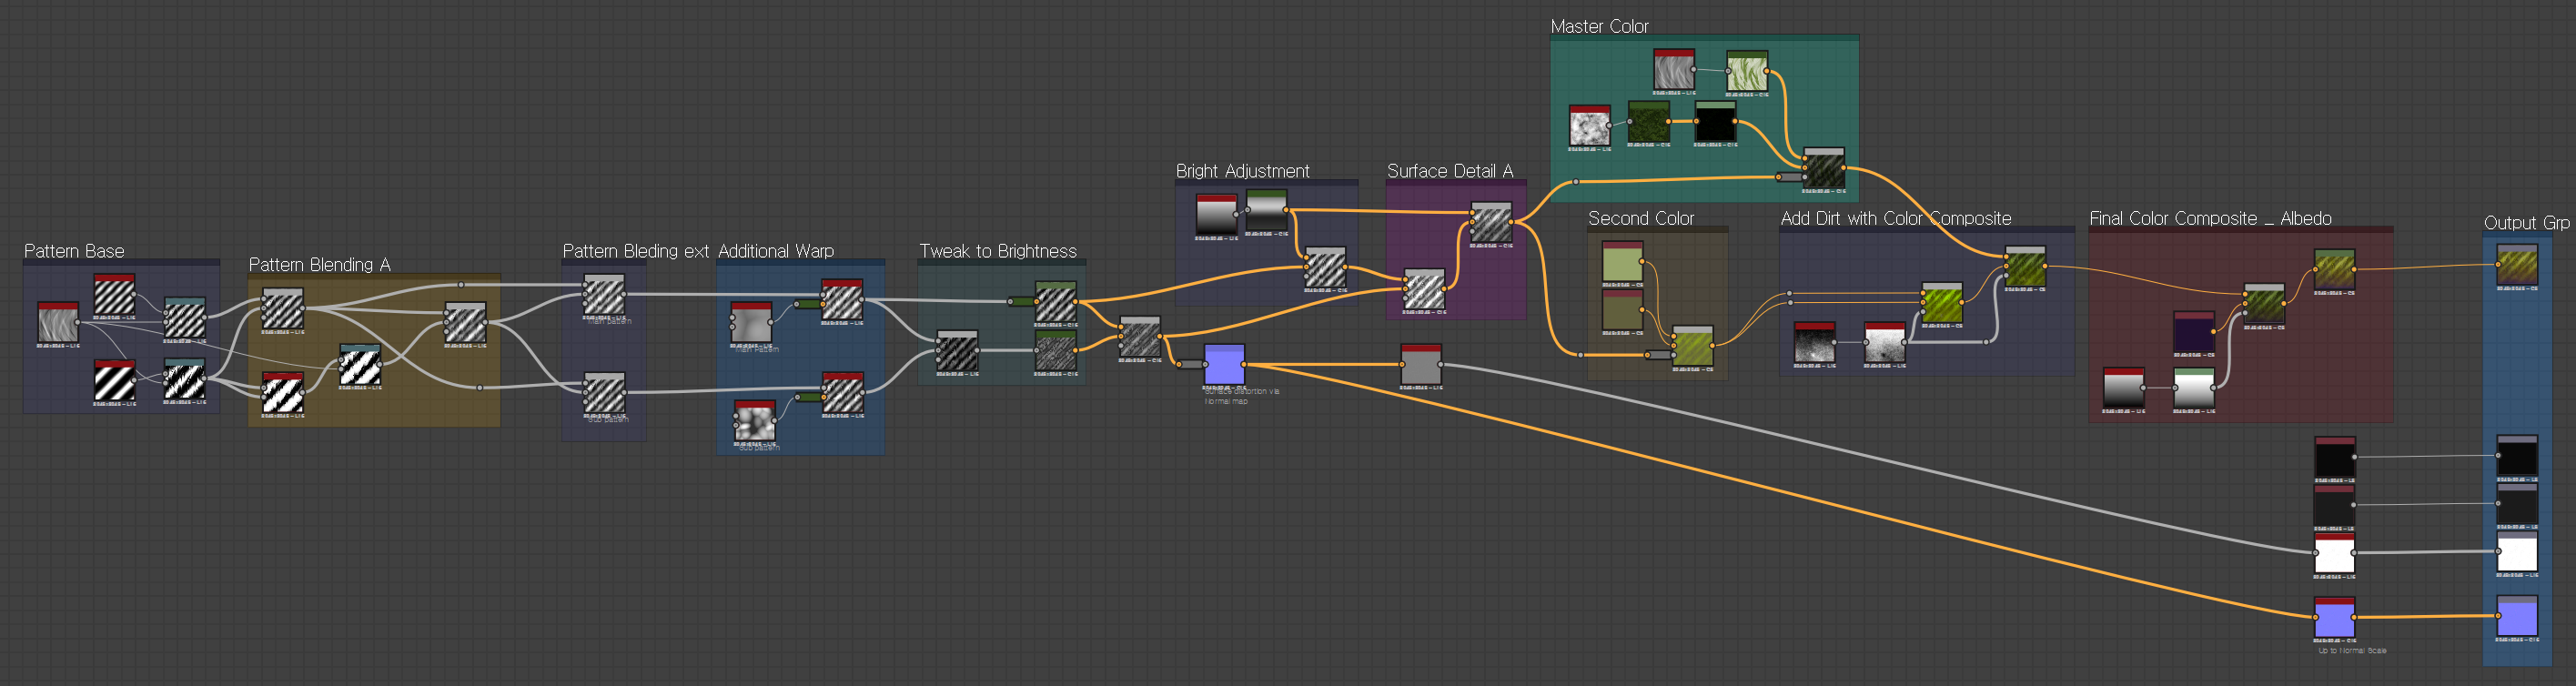
最终 Node Map。

댓글 남기기